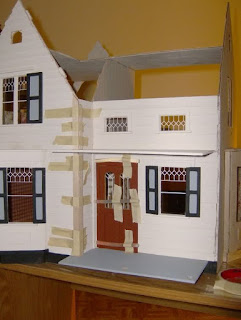
I started siding the dollhouse today. The small wall between the porch side wall and the door will be mostly covered by the door and corner trim, so I'll just paint it.
The windows can be confusing without clear reference photos, but I've figured them out using the schematics. The first floor windows on the left wall and the porch's front right wall have exterior frame hoods with additional trim. The second floor windows over the porch and bay windows do not have hoods. All windows have bottom sills, and the double windows have top trims that function like additional sills. I completed the windows on the front right wall.
The entire dollhouse is cream-colored, which makes details subtle. The porch window has a bottom sill and a hooded top with trim. The windows above the porch have only bottom sills with very thin trim. To address any visible gaps between the trim and siding, I'll use spackle before installing window panes. Using a piece of siding to spread the spackle helps create sharp, clean edges around the window corners. I'll also spackle the seam between the window hood and trim to minimize the gap. It's best to do this before the glue dries, and I recommend fitting shutters during this stage. Working wall by wall ensures thorough completion, and I've organized interior trim pieces near their corresponding windows for easier installation.
When working on the bay wall, I'll spackle gaps between bay walls and ensure siding is flush. Binder clips help keep siding flat around openings and assist with window trim placement. I'll side the gable as close to the edge as possible to accommodate the roof trim.
After painting and installing windows, bay trim, and shutters, I began adding corner trims. These create square edges and should be glued simultaneously to maintain alignment. I recommend letting corner trims dry overnight and using glue sticks to apply proper pressure.


