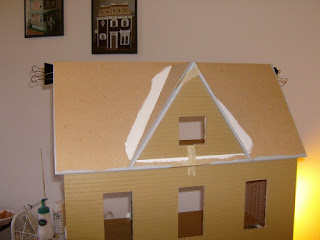
The Vermont Farmhouse Jr Dollhouse Week 10

Attics are very complicated to finish, so you have to plan your finishes carefully. Because this attic also has a dormer window, it makes it even more difficult. Plan ahead and dry fit everything, before finishing and installing.

Dormer Window Sub-Assembly

Before you begin this assembly, finish the wall triangle, where the window opening is. You also want to paint the eaves of the dormer roof/side walls. They will be visible from the exterior of the dollhouse.

Finishing of all of these parts first, before assembly, is crucial because these dollhouses are precision cut and parts sit flush to one another, with no gaps. It will be very difficult to paint the pre-milled siding when it is against another part.

Once the paint is dry, you can begin the sub-assembly. This dormer window sub-assembly has to be done away from the dollhouse. This makes it easier to finish. It's a little tricky to put together, so follow the kit instructions. I did not have to deviate from them for any reason. I would just recommend you place the masking tape through the dormer window opening. This will keep the front wall triangle flush with the top of the roof/side walls.

Front Roof

You have to make two key decisions about your attic, that effect the front roof. Each decision will change the procedure of the front roof finishing.

First, you have to make a decision as to how you want to finish it, paint or wallpaper.

The dollhouse was designed to have this front roof painted, rather than wallpapered. The wallpaper that came with the dollhouse is not high enough to cover the front roof with one sheet. You will either have to join two wallpaper pieces, in order to make the room height, or you will need to add wider baseboards.

I decided to do neither. Instead, I am planning on making a knee wall with wide strip wood along this area.

Second you have to decide what partitions you will want to add to the attic. The dollhouse comes with two, for a three room attic. I will only be using one, for a two room attic.

This is important to know, if you are wallpapering like I am. You have to make sure you wallpaper the front roof, before it is installed and for this, you need to know where your partitions will go.

After you have made your decisions, you can proceed with the finishing of the front roof.

Finishing The Front Roof

I first primed the front roof away from the dollhouse and began planning my wallpaper. I first marked where the side walls will fall on the front roof. You have to dry fit the roof in order to do this. That way you can center it and mark, with a pencil, where the side walls begin. You have to also mark where you want your partition(s) to go.

Now you can wallpaper between these marked areas. I am going to have a large nursery in the attic and a smaller kids room.

I have my fingers crossed, that all of the wrinkles on my wallpaper will eventually dry flat. That's a gamble you take when you don't use the right paste. Luckily these attic walls are at an incline, so that hides flaws a little better. Maybe because I didn't have the right paste, I should have just painted the front roof, rather than gamble on such a large wallpapered area but I like to live dangerously.

When you have a very large opening, like the dormer opening, you will want to cut it out before the wallpaper thoroughly dries. Tacky glue will cause a lot of wrinkles around this area that can become permanent, if you don't cut it out immediately. You just have to very careful doing this and preferably change your craft knife blade, to a new one. Go slowly, this paper is very wet and easily torn at this point.

If you place the roof piece on top of a trash basket, it will allow for your craft knife to go through the opening without difficulty.

And nothing speaks of more danger than solid colored wallpaper, in an attic, with the wrong wallpaper paste. There's no turning back now. This is the color I wanted for the kids room side. It matches the nursery wallpaper. Let's just hope for the best.

Running a fan in the work area will dry the wallpaper quicker. The best advice for a better outcome is to not touch the wallpaper. I know it's extremely hard not to. When you see all those wrinkles and bubbles, you just want to get in there and flatten everything out but this will only crease the wallpaper, causing permanent damage. You can also end up tearing the wallpaper, since the tacky glue makes it so wet and weak. Just let it be. It was hard for me to take my own advice and I think I creased it just a little bit in one area but I don't really know the extent of damage until it thoroughly dries.

Attic Flooring And Side Walls

In order to keep yourself busy and away from the wallpaper, you can begin finishing the attic flooring now. This has to be complete before the roof goes up so do this while everything else is drying. I finished mines the same way I did the other two floors.

I also primed the side walls and wallpapered them. Make sure you use the right print of wallpaper on the right sides.

Installation Of The Front Roof

First, match the front roof up with the back roof, so that you can paint the back roofs eaves. This back roof will only be painted, you do not have to wallpaper it.

Join the front roof and back roof together, with masking tape, just like you did for the dormer window sub-assembly.

Now apply glue to the dollhouse side walls and place the roof structure on top. Make sure it is even and square to the side walls of the dollhouse. Stand away from the dollhouse in order to make sure its even. Clamp with masking tape.

Installation Of The Dormer Window Sub-Assembly And Side Back Roofs

Paint the eaves and main body of the side back roofs and then install them along the back of the side walls. They have to sit flush to the back roof piece and even along the side walls.

Then you take your fully finished and assembled dormer window sub-assembly, apply glue to all edges and place it on the dormer window opening, even on all sides and flush with the bottom edge of the front roof. Clamp with masking tape. Be careful with the wallpaper.

Installation Of Attic Partition

The partition(s) must be primed and wallpapered before installation. Make sure you apply the correct wallpaper print to the correct sides. Always dry fit the partition first, so that you know how it sits in the dollhouse.