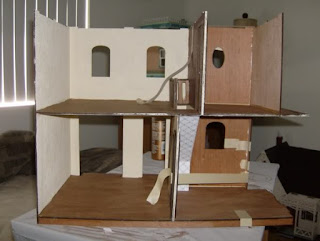
Today, I primed and wallpapered the back of the staircase to match the kitchen walls. Wallpapering this area is a bit tricky; I start with the bottom back and then do the top, allowing about an eighth-inch overhang around the edge. This overhang won't be visible since it faces the front of the dollhouse. You can also choose to stain or paint this area.
Next, I stained the first floor and attached the staircase assembly by fitting its tabs into the floor slots. While that dried, I stained the second floor and inserted it into the staircase assembly. This step is quite challenging. The instructions suggest angling the floor for easier insertion, but that may only apply to raw wood. With a stained floor and wallpapered walls, moisture from the stain and wallpaper paste has swollen the wood, making it difficult to slide in. Getting this floor in requires significant effort, patience, and some tapping with a mallet or hammer.
Avoid using glue at this stage since it's unnecessary; the floor will stay in place when you glue the surrounding walls. Glue could create a mess and risk damaging your wallpaper. While trying to avoid damage to your wallpaper at the edges, some wear might occur, but you can repair it with leftover wallpaper of the same print by matching the patterns. Now that the first floor is dry and the second floor is in place, I moved on to installing more walls.
I started with the front wall, which fit perfectly without any struggle thanks to the laser-cut tabs. Then, I added the right wall. I used masking tape to clamp everything in place, ensuring all tabs fit fully into their slots and edges were flush. For gluing the walls together, I chose tacky glue because it dries clear and doesn't drip, which is important when working near wallpaper. Afterward, I reinforced all interior joints with wood glue but avoided using it where wallpaper meets raw wood since it doesn’t dry clear and could ruin the wallpaper.
I also glued on the back strip of the first floor, located on 'Sheet One' (though it's not marked in the schematics). I aligned it with the back underside of the first floor and clamped it until dry. Finally, I installed the second-floor staircase railing between the wall and long staircase railing, gluing and clamping it until dry.


