I added wooden caps to the top ends of the arches; these are rounded dowel ends, often referred to as round finials, which can be found in the woodcraft section of craft stores. They are useful for staircases and other details.
I installed baseboards around the room and added ceiling trim. Hot melt glue sticks are effective for clamping the ceiling trim in place until the glue dries. I really like the combination of brown, white, and blue.
I glued in the fireplace and the front and dining room doors. The doors need significant sanding to fit perfectly. A palm or mouse sander works best for this task.
Next, I continued finishing the staircase. I have already installed the second floor bath/bedroom partition, which serves as a stairwell. Once the third floor is added, this area will be inaccessible, so it's important to complete all trimming beforehand. The entire partition must be wallpapered before assembly. Be sure to identify which side faces the bedroom and which faces the bathroom to ensure your wallpaper aligns correctly. Wallpaper the bedroom walls before installing the partition, and take a good look at your staircase through the second floor opening before enclosing it with this partition.
I added all of the trim, door knobs, and curtains to the dining/living area. However, the room won't be finished until the tower is installed, completing the bay area.
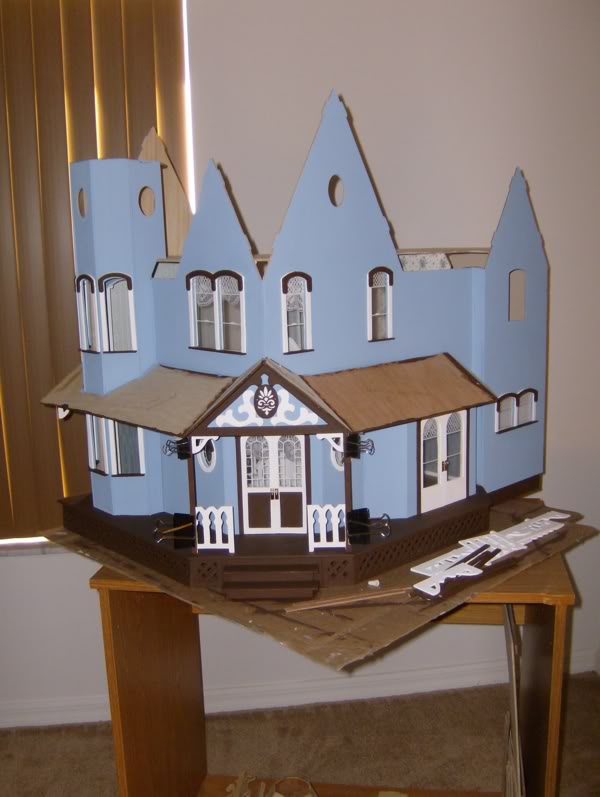
It took a few days to complete the tower of the dollhouse, but it still needs exterior window trim. Assembling the tower itself is not difficult; however, it requires many finishing touches around it. I like using skewers between the tower wall panels for added strength and to eliminate gaps. Before inserting skewers, you must attach your porch roof. This dollhouse has a challenging porch roof assembly that has caused many beginners to give up or discard their dollhouse. The key with this porch is that you cannot finish it in one day. Always paint the underside of your roof panels before assembly.
Start by assembling the side panels with plenty of tacky glue and let them dry for 24 hours. They need to be sturdy before handling since they have minimal support on the walls. After that, insert wooden skewers between the tower walls. Let them dry, paint them to match, and apply spackle where there are gaps. Sand down any rough areas and give everything a second coat of paint. In the meantime, avoid touching your porch roof.
I assembled the kitchen bay and applied skewers just like I did with the tower. I also finished wallpapering some interior rooms. This dollhouse requires a lot of wallpaper; three sheets per room may not be enough, especially for larger areas like the master bedroom and dining/living room. If you run out, take a sheet to an office supply store to have copies made. The ink may differ slightly in hue from your original wallpaper, so it’s best for completing less visible areas like behind fireplaces. Office supply stores can produce high-quality copies on large paper for about a dollar—much cheaper than using your home printer.
Another issue with this dollhouse is that it not only consumes wallpaper but also requires frequent patching due to its long walls and twists. Keep patching minimal and only do so when absolutely necessary on less visible walls. Avoid mixing original wallpaper with printed copies since color differences can be noticeable. I had to patch extensively on the second-floor right wall; however, once everything was in place, it became barely noticeable. While it's not ideal, dollhouses are handmade, so these issues can arise. Learning to work around problems is essential in dollhouse building; otherwise, you may end up frustrated.
I installed the attic staircase and decided to glue it in place since this dollhouse is intended for a child. Loose parts are likely to get lost over time, so gluing down as much as possible helps prevent missing pieces. Now that my porch roof is dry, I can continue working on it. I added the middle section. The porch posts will help straighten this front part, so install them alongside the front railing. While this may seem straightforward for a dollhouse build, it took me all day due to creating a medallion in the middle using a stencil and spackle. This small piece was challenging to hold steady while applying spackle without shifting either it or the stencil - a true test of patience! After several attempts, I finally got it right.
Next came touching up all around the design with brown paint - a task that required a magnifier and needle-tip brush under bright light without my glasses! It took quite some time but was necessary since spackle isn't as white as surrounding trim. Once everything dried, I painted over the design because spackle's color stood out against white trim. Carefully painting under bright light required great precision but was worth it because it now looks carved from wood. However, fitting painted pieces back into place can be tricky due to wood swelling from moisture from paint and glue. It took considerable effort to get this medallion back into position without damaging it - but I succeeded!
If there are gaps where your porch posts meet, use skewers to fill them in. For added detail on my porch entry posts, I used two round finials.