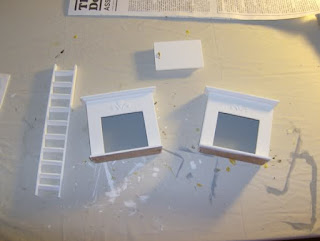
I assembled the chimney and completed the attic staircase and door, both of which will be painted white. They are easy to assemble, but you'll need to measure each step to ensure even spacing.
I decided to assemble the tower roof differently than instructed. My previous attempt using the instructions was unsatisfactory. The instructions require hot melt glue to hold things in place, followed by wood glue on all seams. I wanted to try a new technique.
First, I laid the tower sides, good side down, in a circle on a flat surface and used masking tape to hold them together. This allowed me to form a cone shape without it falling apart. I then taped the ends together to secure the shape.
Next, I inserted the top piece with glue and waited for it to dry, using masking tape to hold the sides tightly against it during drying. Once dried, I glued the bottom piece in place. This process requires a lot of glue and patience while waiting for everything to dry. Avoid touching it too much during this time to prevent it from coming apart.
After the ends dried, I applied glue between the side seams as well. Messiness with glue doesn’t matter since the exterior will be shingled and the interior painted. I might mix paint and spackle for added texture inside.
I painted all interior components white to match the staircase. I added a handle to the attic door and painted the raised fireplace decoration, which now looks carved. For the backs of the fireplaces, I used sandpaper painted gray. Sandpaper is an economical choice for fireplaces and roofs.
I worked on finishing the base. The foundation lacks backing for the lattice, so you must paint the entire frame's interior; otherwise, raw wood will show through the lattice holes. You don’t need to paint the underside of the first floor since it's not visible. You can access all areas under the base for painting after assembly with some maneuvering of your paintbrush. A flashlight helps ensure no raw wood is visible through the lattice holes. Note that the lattice is fragile; if it breaks, it can be easily repaired with glue. I stained the floor with a dark faux stain.
Next, I began putting up walls. Follow the instructions carefully because you cannot install them all at once; you need to fit in the staircase first. I wallpapered the dining and living room before installing the staircase.
When fitting the staircase, trim its bottom like you would your floors to hide any gaps or crevices between it and the walls or floors. I added wooden beads to the corners of the staircase railing for extra detail. Make sure every side of your staircase looks perfect, even if some parts will be hidden from view. It's nice to see consistent work through windows and doors. This is also a good time to check everything since access will be limited later.
Once the staircase is in and dry, you can install the second floor. It may not fit easily; you might struggle as other parts straighten when added. Use strength to tighten joints as needed. A lot of masking tape and glue will help, but be careful with your wallpapered walls. Once everything is dry, sand down any tabs protruding from exterior wall slots and fill them in with spackle before sanding again.


