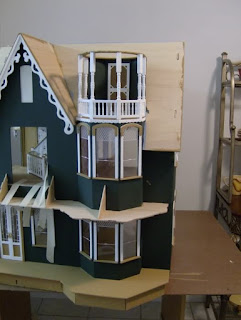
The Garfield Dollhouse Day 17

Afterwards, I continued working on the tower gazebo.

First the turret. Trace a turret side on paper so you have the template for shingling. You don’t have to trace them all. Trace one and that would be the template for them all.

The problem begins with the turret assembly. There are no slots or tabs to keep the turret sides together while you're assembling it. The best way to keep these sides in place while your wood glue dries is by using hot glue.

Make the measurements the instructions tell you to on the panels and mark them.

I want to apologize in advance for not having pictures of the actual process but it's impossible to hold the turret together and take pictures. This is a process that needs both hands.

Take the bottom large ring with the two slots. Forget the top circle. Dab two hot glue dots on each side of the marked pencil line you made on a side panel and place the ring on it. That panel will hold, without falling off so you can do the same thing to apply the rest. Go all the way around the ring, hot gluing each panel as you go along. Keep the ring edge on the marked pencil line so each panel is even with the one next to it.

After they are all on, turn the tower right side up and hold all the panels together and evenly at the top. Make sure every edge of each one is flush with the one beside it, with no overlaps. Use masking tape to hold them together in that position. Put the masking tape all around the top to make sure you got every panel.

Now take the small tower top circle and apply wood glue all around it. Slide it all the way to the top of the turret, through the bottom. Push it until it reaches the pencil marks you made. The masking tape will keep the panels from pulling open as you do this. Keep the tower top level. If it's too tight at the top to push it up to the pencil marks, use a long dowel and a hammer to tap it in place until its straight and on the mark.

Now you can put wood glue all around the bottom ring joints and reinforce the top as well. Be messy, don’t skimp out on the glue, because you will paint all of the interior of this turret. You don’t have to put glue on the side panel joints because they will be covered with shingles.

While the tower dried, I cut the porch railings to fit between the posts of the gazebo bash. I had to dry fit each so I can mark with a pencil their length and the angle of the cut. Since the gazebo is in a circular shape, the railings can not be cut straight or they won't touch the posts correctly. I find it easier to do this by test fitting each piece and marking the angle of the cut instead of fumbling with measurements. Remember that they must be painted before installation.

Sand the cuts for the perfect fit and place them between the posts. Keep a gap between the gazebo floor and the railings. Remember, I did this all eyeballing it. I suggest that you do the same. The die cuts are just not mathematically perfect. If I were to measure each gap between the railing and the gazebo floor so that they would all have the same width number, I will end up with a lop sided gazebo. Exact measurements are just not useful for these types of dollhouses. You need to eyeball it to make sure it looks straight and even.

After the railings were in place, I dry fitted the turret. If you see a panel that’s slightly off, from the top or bottom, sand it even with the rest. You also have to sand the top of the gazebo ring, the one that’s resting on the posts, completely flat. You can't have any tabs from the back walls poking out. They have to be sanded flat or the turret will not sit straight and be lopsided.

Once I got the perfect fit, I painted it and added a Victorian trim all around it. I put the trim about a 1/8th" in from the edge of the ring. It can't be too far in or the trim will prevent the tower from fitting properly but it can't be too far out or it won't look right once the shingles are in place. Luckily the ring on the turret is much wider than the ring that’s holding the gazebo posts up.

Once the trim was in place, I dry fitted the turret again and it fit perfectly. Make sure that the turret ring and the ring of the gazebo top are sitting evenly on each other so that you know the turret is on straight and with the same overhang on all sides.

Don’t worry about the slots on the turret ring. They are useless for this bash but they can still serve a purpose. You can use them as guides to let you know what the best side of your turret is so you can display that side forward.

DO NOT GLUE YOUR TURRET PERMANENTLY. Furniture might not fit between the posts so the only access into and out of the gazebo, would be through the turret top.