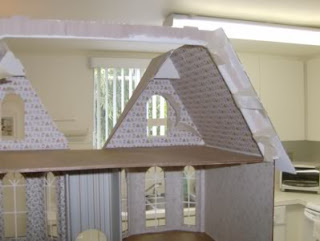
Gather all the parts needed for the dollhouse roof, which also includes the attic walls. Careful planning is essential before assembly to ensure a proper finish. Do not try to wallpaper the attic after it has been constructed; it won't work. It's important to complete all wallpapering before assembly.
Start by priming the walls, focusing on the wallpaper side of each roof panel, which will have a rougher texture. Once the primer is dry, dry fit a panel to locate the eaves, typically an inch from the bottom and sides. These eaves will be painted rather than wallpapered, as they will be visible on the exterior once the roof is installed. Use a pencil to mark the eaves line. You don’t need to wallpaper the back wall since it won’t be visible from outside. Just paint it to match the ceilings in case someone looks through the windows; avoid leaving raw wood.
Next, plan your wallpaper. Gabled attic roofs require a lot of wallpaper, so cut all your pieces for each panel before gluing them to ensure you have enough. If you find you don’t have enough wallpaper, consider these options - buy more of the same pattern, paint some walls while wallpapering others, print more at an office supply store, or patch with leftover wallpaper.
After cutting out your wallpaper pieces, glue them onto the panels, ensuring that patterns are oriented correctly. Only apply wallpaper to the visible parts of the panels; leave the eaves white with primer. Once the wallpaper dries, paint your eaves any color you like, being careful not to get paint on the edges of the wallpaper.
After everything is dry, use a craft knife to cut out all slots from the panels. Glue in the back wall, which serves as a thin roof support. Then paint and glue all supports to the roof panels. There are three types of supports, and it can be tricky to determine where they go, so refer to pictures for guidance.
Now for assembly - you'll need a rubber mallet because the roof won’t just fall into place; it requires some force. Be gentle when tapping since the back roof support and front attic walls are fragile. Hold these parts while tapping in the panel. Start with the side panels, ensuring that triangle supports face toward the front of the dollhouse. As you assemble, you'll get a clearer idea of how everything fits together. After securing the side panels, attach the front gables. The side panel supports will help hold up these walls. Use clamps and masking tape for added stability during tapping.
Next, glue on the top flat roof while ensuring its supports face toward the front of the dollhouse. These support tabs will eventually fit into middle front roof slots but not yet. Now install side roof and flat roof supports; these were not installed before assembling the roof. The easiest way is to turn your dollhouse upside down and tap these supports between the side panels and flat roof panel.
Once upright again, touch up any paint on the supports. Don’t worry about adding more pieces to the front middle roof just yet; let this assembly dry overnight since it's too weak for further tapping right now. Make sure everything is clamped securely.
You can now add knee walls for extra support when you tap later. These walls will be visible from both inside and outside; I painted one side to match my dollhouse walls and stained the interior. The instructions suggest fitting knee walls at a slight angle, but I prefer them straight—it's up to your preference since they aren’t structural components. Use glue sticks to press them against side panels, applying pressure at both top and bottom so they don’t lay flat against it. I taped a paint bottle outside against the roof panel for added pressure towards the knee wall.
Finally, check both interior and exterior joints to ensure everything is tightly secured and that no clamps have come undone. Look for any dripping glue as well. Let everything dry overnight.


