Today, I plan to finish the first floor of the cottage and start on the upper level. To do this, I need to prepare some trim. I bought long balsa wood beams from a craft store; they are lightweight and easy to cut. I stained these beams, along with some skewers and thin sticks. Achieving the look I want requires a lot of trimming. Once everything dried, I began trimming the ceiling edges with skewers. The best method was to turn the dollhouse upside down. To keep stubborn skewers straight, I used a combination of clamps and glue sticks, along with masking tape for hard-to-reach areas.
I also trimmed the underside of the fireplace mantle. While this area isn't visible when the dollhouse is upright, it revealed a gap when turned upside down. Now I'm considering what to do with the ceiling. I stained an octagonal piece and plan to use skewers as beams since the larger beams are too big for this floor. After measuring the medallion, I cut skewers to create the beams. I finished all the trimming, applying bead board and trimming it at the top and bottom, as well as around the bay opening, bay window, fireplace, and ceiling. I even added a trim piece to the bottom of the door. Eventually, I'll need to trim the back edges of the floors and walls.
Next, I moved on to the attic. I started by preparing the roof parts and painting their edges in a thatching color. I assembled most of the roof except for the back section, which needs stucco before it can be attached. I glued together the gable roof, ensuring that having all parts together helps eliminate gaps in the stucco. The bay roof needs to be finished before gluing it on since it will be inaccessible later. I used masking tape around the edges of the floor to protect it from stucco. Now, I have to wait for the glue to dry before applying stucco because I can't work with all that tape in place.
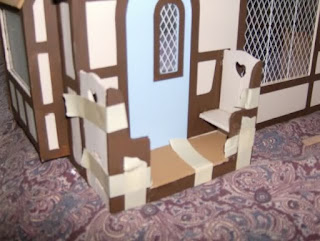
While waiting, I worked on the settles for the porch. Although they were challenging due to stubborn tabs, I ended up liking them more than expected, especially with my chosen colors that complement the half-timber trim.
Once the roof was dry, I removed most of the masking tape and began applying stucco. I mixed it in a container like I did for the first floor ceiling and spread it over the attic. It’s enjoyable to use because it effectively hides gaps without needing tedious wallpapering or trimming. Just be cautious about stained floors; if you plan to add flooring later, do stucco first. Also, watch out for edges between walls and roofs since thick stucco can seep through gaps and damage exterior trim if not applied carefully after glue has dried. I also applied stucco to the bay roof and glued it in place once dry. I'll need to trim its underside for a cleaner look inside.
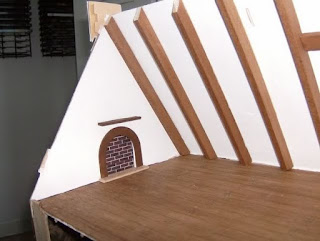
I discovered that there's a gable in the attic roof visible from inside, which complicates my beam placement but doesn’t deter me from my plan. Cutting these beams is easy; they feel like Styrofoam inside and are simple to work with without power tools. I positioned two side beams first while using masking tape to hold down a bulge at the top of the roof since it lacks support from the back half. This step is crucial to avoid surprises when attaching that part later. To maintain consistency in appearance, I added a sideways beam above the gables and positioned the fireplace below it. The white stucco around it looks great!
After gluing on the back roof, I stained all upstairs trim pieces and attached them carefully over several hours of work. I spent additional time touching up paint and spackling on the settles.
Finally, I glued a lock onto the door and assembled a window box with flowers because I couldn't wait to see how it would look!


