I installed the bays on the dollhouse, which was easy to do. It's best to install bays before wallpapering to ensure a smooth finish. Wrapping wallpaper around bay corners enhances the dollhouse's appearance and strengthens the joints between the walls as the wallpaper paste dries hard.
I primed all the walls and also primed the floors in a color similar to the chosen flooring. This helps conceal any raw wood or white primer that might show through the flooring planks.
Next, I painted the ceilings, which is a good idea to do before adding wallpaper and flooring. I reinstalled the staircase back. Wallpapering this kitchen can be tricky due to the awkward staircase that forms one of its walls. Depending on your finish choice, you might stain or paint this staircase back in a color that complements the walls, which would eliminate the need for wallpapering it. However, in this case, matching it with wallpaper looks best, as the white trim would clash with the chosen wallpaper print.
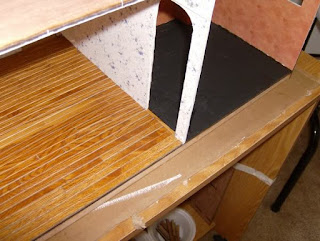
I installed vinyl oak flooring in the living room. Even though this flooring has a sticky back, it's important to reinforce it with tacky glue. Staggering the floor joints will give it a more authentic hardwood appearance. For the doorway without a door, I made a threshold by cutting one of the vinyl flooring strips in half lengthwise to fit in the opening. This threshold nicely separates the wood flooring from the kitchen tile. I primed the kitchen floor black since it will have black vinyl tile.
Now comes the challenging part - wallpapering the staircase back. As mentioned earlier, due to the wallpaper print and white trim, this area must be wallpapered to match the rest of the walls. This can be quite difficult. Since the wallpaper has a border, there is only one way to apply it to this staircase back. Start by wallpapering the right wall up to the edge of the staircase back. Making a paper template first will simplify this process; you can then cut your wallpaper using that template for a perfect fit.
Next, wallpaper the front of the staircase back and fold it around to cover the left wall. To do this properly, you’ll need to cut a slit where the wall breaks so that the wallpaper can wrap around smoothly. Finally, wallpaper the front wall with the window and then tackle the left side wall using another paper template for accuracy.
You may encounter two issues. First, the border may not align perfectly with the rest of the walls on the front side of the staircase back because this slanted wall is longer than others. While this discrepancy isn't very noticeable once finished, consider avoiding bordered wallpaper if that bothers you. Second, when applying wallpaper to the left side wall of the staircase, you'll need to cut it right up to its front edge, which could make any joint visible if your wallpaper has a white backing and is thick—like mine. Be cautious when purchasing miniature wallpaper. Many online stores print their own designs, which can lead to problems.
White-backed wallpapers can reveal patches when they overlap, and thick cardstock materials are difficult to work with in corners or around bays and don't lay flat well. I found it challenging to get this left wall edge to lay flat, but it's not very noticeable. Avoid rubbing too much on your edges as it might smudge ink; handle everything gently and try not to use your fingers directly. I use a tiny rolling pin for flattening edges gradually as glue dries—this method ensures they stay down effectively over time as they become stickier and drier.


