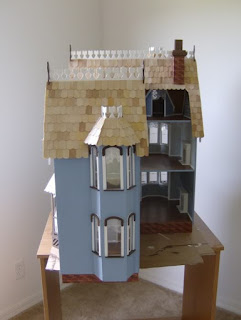
Despite using shingle templates, you may encounter small gaps. Fill these gaps with Minwax Stainable Wood Filler only, as it matches the unstained shingles and stains well. Apply it sparingly with a small putty knife and wipe away any excess.
To access the hidden tower room, leave the tower roof removable. Otherwise, you will only have attic access, which is too small for furniture. I added felt dots around the tower top to prevent scraping when placing the roof. Remove the tabs from the tower walls and spackle the slots in the tower roof since they are unnecessary for a removable roof. Cut the back shingles flush with the bottom edge of the tower roof to ensure it sits properly without overhang.
Assembling the tower roof can be challenging, and it may not sit completely straight. This is due to the entire dollhouse not being perfectly level or square. To make it appear straight, align it with the shingles. Shingle the tower roof while it is on the tower, adjusting your templates slightly until it looks straight. Remember to glue on your brackets while the tower roof is in place.
I recommend using hot melt glue to attach the tower roof shingle templates. This will prevent any slight movement that could make your roof look uneven. This is also an appropriate use of hot melt glue for attaching curtains, as it allows for easy removal if you wish to redecorate later. Glue curtains only to the window trim, not to surrounding wallpaper or acetate windows. The stairwell window can only be accessed through the double front windows and the tower opening, so complete these windows, including curtains, before installing the tower walls.
For the chimney, I spackled the top with a mixture of spackle and dark brown paint and covered the bottom part with a brick print out. Always attach chimneys after shingling for a neat finish along the edges. You can cut off any unnecessary tabs so that your chimney sits flush against your shingled roof.
This dollhouse does not include interior trim for bay arches or the tower room attic entry; you will need to create this trim using basswood. I like to add wooden pegs where trim meets. For door trim in the tower room, use fabric flowers or soft materials to cover upper corners since they curve and cannot accommodate wooden pegs.
You will need a lot of wallpaper for this dollhouse—three sheets per room is insufficient for both bedroom and dining/living areas, especially if you want them in the same pattern as I did. The bays consume wallpaper quickly, and don't forget about the bedroom stairwell and tower. I suggest getting four to five sheets of the same pattern for these rooms. If you run short, take a whole sheet to a copy center for a reproduction; while there may be slight color differences, it can be used on less visible areas like side walls or stairwells.
The dollhouse has exposed roof eaves visible from the second floor's interior. I prefer covering them with fabric, using lace for a lightweight look. Apply fabric with hot melt glue after painting your eaves white or another matching color. Turn in fabric corners to prevent fraying.
If this dollhouse is intended for a child, consider gluing everything in place—fireplaces, attic staircase, and attic door - to prevent loss of pieces. The attic features many twists and turns; complete your windows before installing roof panels. I used a combination of paint and wallpaper here. For a fully wallpapered attic, wallpaper each panel before assembly; you'll need six or seven sheets of regular miniature wallpaper or more if using scrapbook paper. Ensure patterns are aligned correctly without upside-down sections.
Regardless of your choice - paint, wallpaper, or both—the attic requires extensive trim for a finished look. Trim both top and bottom of the tower room with floor and ceiling trim as well; if it's visible, it should look complete.
The porch medallion offers many decorative possibilities; you can glue on an ornament or use a stencil to paint or spackle a design.
Now that the dollhouse is complete, it will be picked up delivery to its new home via freight.


