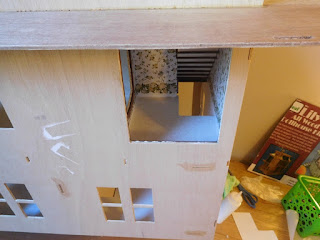
Finishing the Foyer and First Floor Staircase
We can finally finish this room before it is closed off permanently. I started by wallpapering the staircase, which is the finish I chose. If you plan to do the same, make sure to fold the wallpaper over the joint between the wall and staircase to avoid any visible gaps. You don't need a perfect diagonal cut along the staircase steps because a trim piece will cover that area later.
Next, I wallpapered the remaining walls of the foyer. This can be challenging, so it's important to measure carefully and anticipate any problem areas. The limited space makes it difficult to maneuver your hands. I wrapped the edge of the wallpaper around 'Partition #2' at the top of the staircase to hide any raw wood edges. You will also need to make a small cut in the wallpaper where the staircase step overlaps the wall for a proper fit.
Focus on getting a perfect fit for the wallpaper on the front wall next to the staircase, as this is visible when you open the front doors. The right corner next to the double doorway won't be seen from most angles except through the foyer window, so if that edge doesn't align perfectly, it's not a concern. I managed to line up all my wallpaper borders at the top, but I realized too late that using a wallpaper with a top border made things more complicated. Nevertheless, it turned out quite well.
Once the wallpaper is in place, you can install flooring. I'm using a lovely tile-patterned scrapbooking paper gifted by my friend Jean, featuring muted greens that will complement the rest of the dollhouse. For non-square rooms, create a template using regular copy paper to avoid patched flooring. I tape pieces together until I have an accurate replica of the floor, then transfer this template to the tile paper for cutting. The edges don’t need to be perfect since baseboard molding will cover them. I used wallpaper paste to glue down the tile paper.
Next, I stained and glued in place all door trim. I debated whether to paint or stain all moldings in the dollhouse. Since stain hues can be tricky and I'm using flooring, I initially leaned toward white paint but ultimately decided on stain. Matching hues throughout may be challenging, but fortunately, this dollhouse has consistent wood grain. Creating molding for the side of the staircase was quite difficult and required careful dry fitting and cutting for a good fit. Touch-ups are also necessary in tight spaces, so a fine tip brush is essential.
To hide gaps at the bottom of the staircase where it meets the floor, use siding strips cut to fit around the bottom riser. Paint them and glue them in place with hot melt glue to prevent warping. This instantly conceals gaps and straightens any crooked appearance. I applied all baseboard trim in the foyer. For the wall with double front doors, a handheld mirror is helpful.
After that, I added a coat of acrylic gloss varnish on the tile paper for a nice shine. Now it's time to turn the dollhouse upside down to work on the ceiling. While it's upside down, consider applying wood glue to any joints you may have missed in other rooms. I made another paper template for cutting ceiling paper to ensure an exact fit. Avoid using expensive wallpaper paste on ceiling paper; tacky glue works well instead. It may wrinkle slightly due to moisture but will flatten out once dry. Some ceiling papers come pre-pasted, but I chose not to use that option this time.
Finally, I applied ceiling trim just like I did with the flooring. Notice that on the staircase wall, the ceiling trim goes all the way down to meet the staircase riser for a smooth transition between upstairs and foyer wallpaper.


