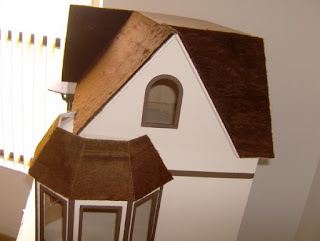
Now that my foundation is complete, I've started adding the "thatch" to the dollhouse. It's best to create paper templates for your roof panels before installation, but I forgot to do that, so I made them afterward. I pressed paper against each panel and creased it along the edges to mark where to cut. It would have been easier if the panels were flat, but fortunately, this dollhouse has simple roof panels with mostly straight lines, making it manageable.
Use the paper templates to cut your fabric, ensuring you work on each roof panel individually. Avoid cutting one long piece for rounded roofs like the tower or bay roofs, as it won't look right. Using separate pieces for each panel and butting the edges together will create a more realistic appearance. I'm using the same dark brown faux fur I used for The Aster Cottage Dollhouse because it gives a realistic thatch effect. I was lucky to find it again, as many fabrics get discontinued. Generally, shorter-haired fur looks more realistic for thatching, but your options depend on what's available at the fabric store and the look you are going for. Fortunately, dark and light brown fur is usually easy to find.
Make sure you buy actual faux fur instead of felt or flannel. Faux fur has a distinct "hairy" texture with visible fibers, while felt and flannel do not work well for thatching. Be cautious when shopping, as these fabrics are often displayed together. I purchased one yard of faux fur for this dollhouse, which was enough to cover everything. Remember that faux fur is one-sided, so when you buy a yard, you're effectively getting two yards for the price of one. Faux fur can be pricey, so ensure you buy enough. Fabrics can be discontinued, and running out mid-project could leave your dollhouse looking mismatched.
Cut your thatch slightly larger than your roof panel and trim it to size once it's glued on for a perfect fit. Always cut with the fur grain running downwards so you can comb it later with varnish. Thatching is similar to wallpapering - cover the far panels first and then the side panels last to hide corner seams.
For the delicate porch hip roof, use lightweight paper for templates instead of thicker postal paper. Thicker paper makes creasing difficult and could put too much pressure on the porch roof since it's only held up by a thin line of glue against the dollhouse wall. I managed to hide any gaps between the joints of the porch roof with fur.
The hinged side roof panel will be trickiest. Trim flush to the roof edges so that it moves freely. I recommend leaving this panel until last and completing the rest of the roof first. Be careful not to apply glue directly to your chamois strip; it might leak into the joint and stick your panel together. The chamois strip will be hidden under the faux fur, as will any metal hinges.
You also need to leave an opening in the fur for your chimney. Make sure it's not too large—otherwise, bare wood will show around it—but also not too small, or your chimney won't adhere properly. My chimney is heavy because it's covered in pebbles like the foundation, so it needs to rest securely on the wood for good adhesion. I haven't finished the flue area yet.
Butt all joints in your faux fur as closely as possible to avoid gaps. Once you get used to thatching a dollhouse roof, you'll find it's much quicker and easier than shingling.


