Color Schemes and Paint
Choosing A Dollhouse Color
Choosing the right color for your dollhouse can be one of the most challenging aspects of the process. Even the most beautifully assembled dollhouse will lose its appeal if you are unhappy with its color scheme. Colors should be selected carefully because once applied, they are permanent. Dollhouses can only be painted during assembly, so ensure you are confident in your choices, as changing them later is not an option.
If you plan to use multiple colors, paint wood sticks with each color and assemble them together to see how they complement one another. Take the painted sticks into different lighting conditions to observe how the hues change and interact.
Consider using a color scheme generator or other color palette tool to assist you in your selection.
Plan your colors meticulously and obtain samples. The image on the paint bottle or can may not accurately represent how the color will appear on wood or after drying. The same applies to online color selections; every monitor displays colors differently, so the hue you see may not reflect the actual paint color when purchased. For this reason, always use color samples as a guide, whether online or in print.
Your local hardware store typically offers a wide array of color sample swatches for you to take home and evaluate. Swatches are particularly helpful as they display an entire scheme of complementary colors together. Some hardware stores even provide free paint sample pots for you to try at home. Additionally, many paint manufacturers offer free sample pots online. Many builders utilize these samples to paint their dollhouses. Be adventurous and think outside the box; colors you initially thought would never work together might create the best scheme for your dollhouse.
Alternatively, your dollhouse may look great as it is, without any color. All-wood exteriors can be made interesting by staining the dollhouse with various color stains, stenciling designs of your choice, or applying different washes to the exterior wood.
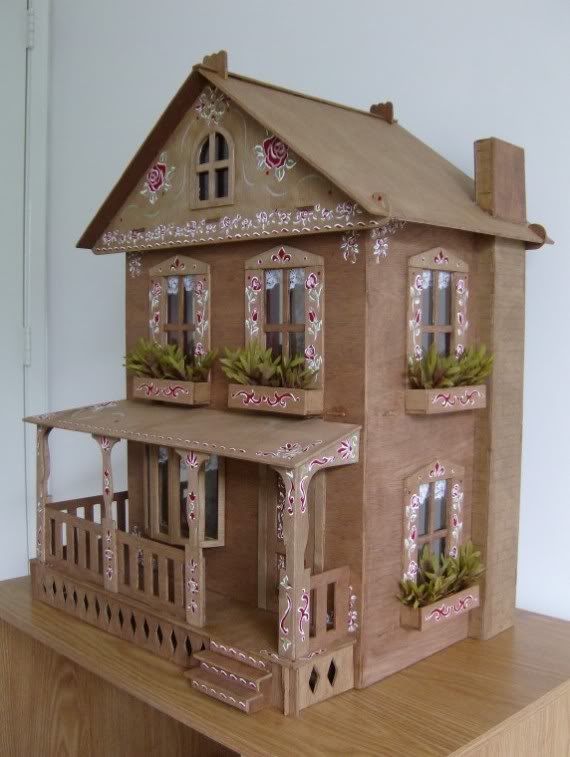 |
| Stenciled Washington 2.0 Dollhouse |
Explore dollhouse catalogs and the internet for inspiration on various color schemes. It can be simple to select a single color you love and create a scheme by choosing different shades of that color.
Most dollhouses consist of numerous parts, and the true impact of these details is enhanced by using a variety of colors. Victorian Painted Ladies, for instance, were adorned with multiple colors to highlight their intricate architectural features.
Ultimately, color schemes are a matter of personal preference; there is no wrong choice for painting a dollhouse as long as the outcome resonates with you.
 |
| Orchid Dollhouse With Light Walls and Dark Details |
 |
| Arthur Dollhouse With Dark Walls and Light Details |
I enjoy painting my dollhouses using no fewer than three colors and no more than five. My guideline for selecting a five-color scheme is to include white as one of the colors, choose three colors of a similar hue, and use one bright color as an accent. This Beacon Hill Dollhouse exemplifies a five-color scheme, with the bright blue serving as the accent color.
 |
| Beacon Hill Dollhouse With 5 Colors In Earth Tones |
In Victorian times, many earth tone hues were used on a single house to create a multi-colored effect. However, what about opting for a brighter look with some standout colors instead?
 |
| Willowcrest Dollhouse With 5 Colors In Bright Tones |
While there may be a preference for a multi-color palette, don't shy away from a monochrome look. Some dollhouses can appear just as detailed and appealing with gingerbread and walls in a single color.
 |
| Monochrome Westville Dollhouse |
If deciding on a color scheme feels overwhelming, consider the classic three-color approach. In this scheme, the walls are painted in your chosen color, while the gingerbread is always entirely white. The third accent color is typically used for doors and exterior floors, often in shades of brown or gray. This is the most popular scheme chosen.
 |
| Classic Vineyard Cottage Dollhouse |
Before painting your dollhouse, consider what you want to achieve with it. What style of decor are you aiming for - serious or fun? Will it serve as a display piece or as a child’s playhouse? Additionally, think about whether you are trying to replicate a specific historical era for realism. All these factors should be taken into account beforehand to help you decide on a color scheme.
Also, remember that size matters when it comes to color schemes. What works for a small dollhouse may not be suitable for a larger one. Smaller dollhouses can often accommodate non-traditional wall colors or brighter palettes more easily, while larger dollhouses typically look better in muted tones or classic schemes.
The style of the dollhouse is another important factor in choosing its color scheme. Victorian mansions can handle a wider range of colors than simpler farmhouses or modern ranch-style homes. Lastly, you wouldn’t want to apply bright Victorian colors to a Tudor cottage.
Types Of Paint
After deciding on your desired color scheme, the next step is to choose the paint. I recommend using acrylic craft paint, which can be found at your local craft store. Acrylic craft paint comes in a variety of colors and has a lower moisture content than latex, providing excellent coverage and protecting the wood effectively.
My top brands of acrylic paints are Folk Art and Americana, with Delta as a close third choice; I do not recommend any other brands. Below are links to each brand's color charts, allowing you to browse the available colors.
Plaid Folk Art Color Chart
Deco Art Americana Color Chart
Delta Ceramcoat Color Chart
Always keep a spare bottle of the paint colors you use on your dollhouse for future touch-ups and repairs, as your local craft store may discontinue certain colors over time. If this happens, you will need to order your specific color directly from the manufacturer online. Occasionally, manufacturers may discontinue a particular color, but you might still find a nearly identical match from another manufacturer. This is when an acrylic paint color conversion chart can be quite useful.
Acrylic paint typically comes in a matte finish, which is ideal for a dollhouse. However, if you want to add a gloss or satin sheen, you can apply a layer of acrylic gloss varnish over the paint once it's dry. Alternatively, some acrylic paint brands offer options with a satin or gloss finish.
You can also use latex paints available at hardware stores for your dollhouse. However, it is advisable to avoid semi-gloss and gloss latex paints, as they can highlight any flaws in your dollhouse and interfere with glue adhesion. Never apply oil-based paints to your dollhouse, as they emit fumes and can disrupt the adhesion of glue. Always mix your latex paint with a primer that is suitable for application on wood. This allows for better coverage.
Alternate Finishing Options
When considering an exterior finish for your dollhouse, you might primarily think of siding and paint, but don't limit yourself. Dollhouses can feature a variety of finishes. Stucco, brick, half-timber trim, and stone are just a few different styles available.
Stucco
Dollhouse stucco is available in powdered form, which can be mixed with water or paint to create a textured finish when applied.
Many miniaturists create stucco using lightweight spackling compound, stucco patch, or plaster from the hardware store.
 |
| Haunted House Dollhouse Kit In Stucco |
Brick
Bricks can be found in miniature sizes, either as individual pieces or on a mesh. They can be applied using mortar or glue. Additionally, there are faux brick sheets made from polystyrene plastic, rubber composite material, or paper, allowing for a brick appearance without the need for mortar.
Many miniaturists use Magic Brick to create stone and brick for their dollhouses. Magic Brick is a product that employs stencils and a special type of mortar to form the brick shapes.
 |
| Aster Cottage Dollhouse In Stucco and Pebbles |
Some dollhouses can feature a mossy or earthy exterior finish, which is achieved by gluing moss directly onto the exterior brick or stone of the dollhouse.
Stone
Stone is another popular finish for dollhouses. It can be purchased in polystyrene sheets or paper. Most miniaturists create the stone appearance using air-drying Creative Paperclay, a product that can be manipulated to achieve nearly any exterior texture imaginable.
 |
| Rosedale Dollhouse In Paperclay Stone |
Furnishing Your Dollhouse
To buy furniture for your dollhouse, you first need to determine its scale. Most dollhouses are built to a one-inch scale, and consequently, most furniture is designed to fit this scale. However, relying solely on scale is not sufficient.
Miniature furniture can be quite expensive. Even when purchasing mass-produced items that are not custom or artisan-made, the cost can add up significantly, especially depending on the size of your dollhouse. It would be unfortunate to invest in furniture only to find that it doesn’t fit properly.
It’s important to note that scale is not a precise science; there is a distinction between scale and proportion. Scale refers to a ratio rather than a specific measurement. Many miniature furniture manufacturers exist, and the scale may vary between companies. You can refer to scale conversion charts for guidance.
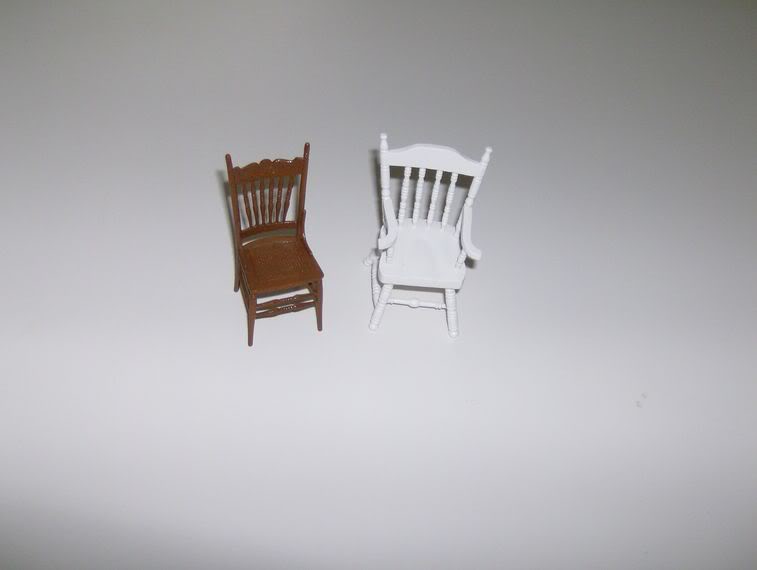
For example, Town Square Miniatures often appear larger, despite being in one-inch scale. Similarly, Chrysnbon produces one-inch scale miniatures as well, but there is a noticeable difference between a Chrysnbon chair and a Town Square Miniatures chair. In a one-inch scale dollhouse, both chairs will appear appropriately scaled; however, when space is limited in your dollhouse, even minor size differences can significantly impact whether your furniture fits correctly.
Another reason you shouldn't rely solely on the scale is illustrated in these pictures. Observe the one-inch scale doll next to the one-inch scale door; the doll appears larger. If it were a full-sized woman next to a full-sized door, she would struggle to get through it. However, when placed together in a scene, your eyes may not perceive those subtle differences. Even though the one-inch scale door is slightly smaller, the doll still appears to be in scale with the dollhouse.

The same applies to this car. Its scale is 1/16, which is not a one-inch scale, yet it appears proportionate to the one-inch scale dollhouse. If I had placed a one-inch scale car next to the dollhouse, it would have looked enormous. This illustrates why proportion is so important. The only way to understand an item's proportion is by knowing its measurements, not just its scale.

Tips for Buying Furniture for Your Dollhouse
Before purchasing furniture for your dollhouse, make sure to obtain all necessary measurements. Most online retailers provide item dimensions in their descriptions; if they do not, proceed with caution, as the furniture may not fit properly in your dollhouse. Be sure to check the return and exchange policy of the retailer you intend to buy from.
Once your dollhouse is assembled, measure the rooms, taking into account the placement of windows and doors, as these can influence how you arrange your furniture. For instance, a contemporary sectional sofa may not fit well if there is a bay window on one wall and a French door on the opposite side. After you have the measurements for your furniture, create paper templates based on those dimensions. Place these templates in your dollhouse to visualize how much space each piece will occupy.
Many people are eager to decorate their dollhouses and start buying furniture before completing the construction. I advise against this unless you plan to build multiple dollhouses. The image on a dollhouse kit box does not accurately represent the actual size of the finished product. This can result in either an excess or shortage of furniture once the dollhouse is complete. If you have other dollhouses to use the furniture in, it may not be a significant loss; however, if you do not, it could lead to disappointment.
The same principle applies to window treatments. Since all windows vary in size, ensure that you take measurements before purchasing curtains.
Interior Decor
A common question among newcomers to dollhouse decorating is how to hang pictures, install chandeliers, or secure small items in place. There are several effective methods for achieving this, depending on what you want to secure and for how long.
Museum Wax
Museum wax is soft, pliable, and becomes sticky with heat. The warmth from your hands makes it soft like clay, and it solidifies again at room temperature. Even in its solid state, it remains relatively soft. This product is advantageous because it is nearly invisible, and a small amount goes a long way. One popular brand of museum wax is Mini Hold.
However, museum wax does have its downsides. It tends to leave a residue on everything it touches. While this residue can be removed by rubbing it off with a soft cloth or warm water, doing so can be challenging on tiny, detailed items. Complete removal of the residue from wallpaper is impossible. Even after rubbing it off with a soft cloth, some residue may remain, leaving a noticeable shiny spot. Using a sealant on your wallpaper may help mitigate this issue.
Additionally, museum wax is sensitive to moisture and temperature changes. If you are securing a heavy object like a chandelier or console mirror, the wax may not provide sufficient hold, leading to the eventual falling of these items.
Poster Putty
For heavier objects, poster putty may be a better option as it is not as soft as wax. These temporary adhesives are available at all craft stores.
However, even poster putty can fail with particularly heavy vertical objects like chandeliers or kitchen cabinets. Similar to museum wax, putty reacts to temperature changes and can soften in warm conditions. You might find your objects hanging from a long string of softened putty as it loses its strength.
Repositionable Adhesives
Thanks to the scrapbooking industry, there are many repositionable adhesives available on the market. These adhesives are acid-free and will not damage paper or leave residues. They are also colorfast, preventing any bleeding of wallpaper ink and typically come in clear formulations that remain invisible when applied.
These adhesives come in various application methods, from glue dots to products like E6000 Extreme Tack Repositionable Glue. With this glue, you can create your own glue dots in any size or shape you prefer. They can be easily removed by simply rubbing them off with your fingertip, usually without leaving any sticky residue behind like museum wax.
Familiarize yourself with these products to find the one that best suits your needs. Always ensure that the product you choose is acid-free and safe for scrapbooking to avoid damaging your wallpaper and miniatures.
Glue
When it comes to hanging heavy vertical items on walls or suspending chandeliers from ceilings, you may need to resort to glue. If your chandelier keeps falling, it risks breaking or damaging items displayed beneath it. Most dollhouse lighting fixtures come with a sticky backing, allowing them to be affixed in place. However, this backing is often insufficient for holding heavier objects against gravity, such as metal chandeliers or kitchen cabinets. Additionally, the adhesive properties of this backing tend to wear out after the first move for redecorating or changing a light bulb.
If you must use glue to secure an item in your dollhouse, opt for hot melt glue. Using white, tacky, or wood glue can make it nearly impossible to remove the object without causing significant damage to your interior decor. When applying hot melt glue, always use a low-temperature setting and only the smallest dab necessary to hold the item in place.
Keep in mind that using hot melt glue should be viewed as a permanent solution. Some hot melt glues allow for gentle removal without damaging the surface they adhere to when used on a low setting; however, this is not guaranteed. Always keep a scrap of every wallpaper pattern you use in your dollhouse. This way, if any damage occurs, you will have the same pattern available for repairs. If you lack a wallpaper scrap and find yourself in a difficult situation, you may need to use colored pencils to blend in the damage or cover the area with an object like a picture or large piece of furniture.
Many miniaturists prefer creating displays where items are permanently placed on tables and cabinets. This approach is convenient because it prevents items from falling and potentially getting damaged or lost. Tacky glue works best for these displays, as items can often be gently pried off the furniture they are glued to. This is due to the polyurethane finish on miniature furniture, which prevents tacky glue from fully adhering, making items repositionable. However, this result is not guaranteed; similarly to hot melt glue, anything attached with white or tacky glue should be considered permanently affixed.
Regardless of the adhesive you choose, exercise caution with your wallpaper. Museum wax can leave an invisible residue, while some adhesives may cause irremovable colorfast stains. Always test any adhesive on a small inconspicuous area before applying it more broadly and carefully read the manufacturer's instructions regarding its use.
Electrification of Dollhouses
One of the most frequently asked questions about dollhouses is regarding electrification. Any dollhouse can be equipped with working lights for both the interior and exterior, including features like flickering fireplaces and functioning doorbells. However, the methods and materials used for electrification are subjects of considerable debate within the dollhouse community. Each enthusiast has their own preferences and opinions on what is most effective, durable, and user-friendly. Below is some basic information about electrification.
I have previously electrified dollhouses using tape wire, but none of the dollhouses I currently own are electrified. I have chosen not to pursue electrification for several reasons. First, working with electricity can be complex, and one must consider that all wiring will run beneath wallpaper, ceilings, and flooring. If issues arise with the wiring in the future, be prepared to dismantle these decorative elements to locate and fix the problem.
Second, no matter how meticulously you wire your dollhouse, the wiring will never be completely invisible. This is a reality that one must accept and be ready to accommodate. To avoid these complications, careful planning and thorough preparation of the interior finishes are essential, which makes it difficult for me to justify the expense and additional work involved.
Traditional Electrification Methods
There are two primary methods for traditional electrification: tape wire and round wire.
- Tape wire is the most commonly used method because many find it easier to install and conceal. This method consists of a series of copper-lined conductive flat tapes connected with brads. Since the tape is flat, it can be easily hidden beneath interior finishes; you can apply flooring, wallpaper, and ceiling paper directly over it.
- Round wire is a copper conductive wire that operates similarly to the electrical wiring in real houses. However, it is much more challenging to hide. When using round wire, you will need to drill holes through floors and ceilings to hang fixtures like chandeliers, as the wire will be visible if run along walls or up to ceilings. Some miniature baseboards and crown moldings feature small grooves on their backs that allow for seamless integration of round wire along wall edges. Although it is difficult to conceal, round wire tends to be more reliable.
Cir-Kit Concepts is the largest manufacturer of electrification accessories and tools for dollhouses.
 |
| Tape Wire |
You will encounter a challenge at this stage. First, your dollhouse must be completely assembled, but the interior should remain unfinished. This allows you to run the wires through all the rooms and conceal them with wallpaper, ceilings, and flooring. This task becomes difficult if your dollhouse has inaccessible areas that need to be finished before full assembly; otherwise, they cannot be completed later. You will need to carefully plan how to run wires in those areas to keep them hidden or consider leaving them without lighting.
Electrifying a dollhouse requires meticulous planning, and every detail must be considered before proceeding to avoid future issues. Create a diagram of your wiring system and keep it in a safe place, so you can easily locate potential problems down the line. You don’t want to guess where a wire is five years later if an electrical issue arises.
The best advice for those looking to electrify their dollhouses is to avoid permanently gluing finishes. This strategy will prevent damage in the future when making wiring repairs. Make templates of your walls, floors, and ceilings using thin foam core or poster board. Apply your wallpaper, ceiling paper, and flooring to these templates instead of directly onto the dollhouse. This approach allows you to run all of your electrical systems and then place the finished templates over the wiring. If an issue arises later, you can easily access the wiring by removing the templates. Attach your finished templates to the walls using double-sided carpet tape or poster putty. Any non-permanent adhesive will also work well. You can conceal the joints of the templates with crown molding and baseboards, which should also be applied using repositionable adhesive.
This method not only effectively hides wiring but also allows for easy removal in case of problems. Additionally, it offers a great option if you enjoy periodically redecorating your dollhouse.
To learn how to create templates for interior finishes properly, check out my Custom Rehab Dollhouse post.
Tools of the Trade
 |
| Transformer |
 |
| Junction Splice |
 |
| Brads |
 |
| Brad Replacement Tool |
 |
| Pilot Hole Punch |
 |
| Test Probe |
Tape wiring is designed to be durable, so if there's an issue with your wiring, it's likely due to a brad. Loose, pulled out, damaged, or incorrectly placed brads are often the culprits when your system isn't working.
It's also crucial to have the right transformer for the number of lights and voltage running through your dollhouse. Often, wiring fails because the wrong transformer or number of transformers were used.
If you plan on electrifying your dollhouse, I recommend purchasing the wiring instruction booklets sold by Cir-Kit Concepts. These explain the details of traditional electrification, using both tape and round wire, for easier installation.
You can also refer to Darrell's Electrification Guide, which includes pictures and a printable PDF guide on electrification from Real Good Toys. Greenleaf Dollhouses offers extensive electrification articles and tutorials, and there are additional instructions and videos available on the subject.
In recent years, significant advances have been made in dollhouse lighting. The days of having only two choices for electrifying your dollhouse - tape or round wire - are gone. Now, several new product lines are available that have simplified electrification for new dollhouse enthusiasts.
Battery Operated Lighting Fixtures
Battery-operated lighting fixtures resemble traditional dollhouse lighting fixtures but do not require connection to a flat or round wire system. They feature an LED bulb and operate on a 3V lithium battery. While the batteries are replaceable, the LED bulbs typically are not.
These lights run cooler than traditional options and have a lifespan of approximately 4,000 hours. Each fixture includes a small on/off switch. This option is ideal for miniaturists who want to impress visitors with a lit dollhouse but do not plan to use the lights frequently, as these fixtures can be expensive. Once the bulb burns out, the entire lighting fixture must be replaced.
LED Strip Lighting
Alternatively, you can use non-working, inexpensive light fixtures purely for decoration and illuminate the interior of your dollhouse with LED strips. This method is also very effective for display cases. The advantage of LED strips is that they connect to a tape or round wire system, eliminating the need for battery replacement.
You do not need to run the lighting strips throughout the entire dollhouse; instead, you can strategically place them along the back edges of floors, where they can be concealed behind custom trim.
This approach eliminates the need to diagram complex wiring layouts and apply finished templates to your dollhouse. You can electrify an already assembled and finished dollhouse by adding pre-wired custom trim to all back edges. The LED strips will illuminate the interior of your dollhouse, making miniatures easier to see, while also allowing light to shine through the windows from the front.
Landscaping
Landscaping brings life to a dollhouse. Whether you desire an extensive array of landscaping accessories, such as a full garden, pond, and children’s play area, or just a few bushes and trees, landscaping significantly enhances the exterior appearance of a dollhouse. Regardless of whether the dollhouse is large or small, the landscaping process remains the same.
Landscaping Base
The first step is to create a landscaping base. This base will sit on top of the table where your dollhouse will be placed, supporting the dollhouse itself. The heavier and larger the dollhouse, the thicker the base should be.
Typically, bases are made from plywood sheets cut to the desired size for your yard or garden. To determine the correct dimensions, measure your dollhouse's foundation and the amount of landscaping area you want around it. You can either take these measurements to a hardware store to purchase a pre-cut plywood sheet or have them cut one to size for you. It’s advisable to landscape the sheet before placing your dollhouse on it to avoid visible grass seams around the structure.
Instead of plywood, I prefer using a product called tile board for larger die-cut dollhouses. This material is found in the same section as plywood and is generally less expensive. It can be cut to any measurement you need. One advantage of tile board over plywood is that it does not warp or crack; it is exceptionally strong and free from splinters. Additionally, it has a smooth side that can face your furniture to prevent scratches, while the rough side is ideal for adhering faux grass.
For medium-sized dollhouses, foam core can also serve as an effective base. It is easy to cut with a utility knife and can be shaped into various complementary designs rather than just a basic square.
If you're looking for a free option, consider using the cardboard from the box your dollhouse kit came in. This sturdy cardboard can be cut to size with a box cutter, allowing you to add grass on top for a quick and cost-effective base suitable for smaller dollhouses.
Grass
Several materials can be used for grass, including fabrics, textured paint, and foams. However, I will focus on three primary products designed specifically for miniatures - Noch Grass, Astro Turf, and railroad grass paper. Here are some essential points about all three products:
- They all feature paper backing, allowing you to cut them to size with regular scissors.
- They must be applied to your base using spray adhesive or a glue stick. Using standard water-based glue may result in seepage through the paper, leaving visible stains on the “grass” side that cannot be removed and will appear as wet marks even after drying.
- They do not patch well; any attempt at patching will leave visible seams in your “yard.” Therefore, it’s crucial to measure your base carefully to ensure you have a sufficiently large grass sheet for complete coverage. Apply your grass first before placing your dollhouse on top.
Noch Grass


Railroad grass paper is a large roll of "grass" commonly available at hobby shops that sell model railroad accessories. It is inexpensive, and the rolls are large enough to landscape several large dollhouses.
This material differs from others in texture; it is very rough and feels almost like glitter glued to paper. It can be quite messy, so it's advisable to take your base outside or to the garage for application. Once the loose green particles are shaken off, it will not shed much more.

Spring Grass
Spring Grass, another popular option, is essentially a bag of crumbled foam that resembles moss more than grass, despite being marketed as grass. It is extremely challenging to make loose foam adhere to surfaces, and you can expect it to continue shedding particles onto your floor throughout the lifespan of your dollhouse.

Trees
Another important aspect of landscaping is trees and bushes, which are available in various shapes, types, and sizes. You can find them as tall as your dollhouse roof or as small as your front steps.
Squeeze Me Trees are a brand of miniature trees that claim not to crumble or fade. I have many of them around my dollhouses and can confirm that their claims are accurate. None of my trees have crumbled or faded, even after being on display for more than a decade.

You can find less expensive trees of various shapes and sizes at any hobby shop that sells model railroad accessories or they can be ordered online. Additionally, many craft stores offer trees and bushes in their diorama section, which are very useful for smaller-scale dollhouses.

Flowers
Miniature flowers can vary in price, depending on the type you select. The most realistic ones are made of clay and are typically the most expensive. However, you may also find less expensive miniature flowers made of silk or foam.
Explore the floral section of your local craft store, where you'll often discover a wide variety of very small flowers suitable for miniature scenes. Due to their size, these flowers are usually affordably priced. A small bouquet can effectively fill a dollhouse's flower boxes.
I prefer to fill my flower boxes halfway with cotton balls before gluing the flowers to them. This method allows for easy removal if I decide to change the flower colors later. The cotton also helps the flowers stand upright while the glue dries. Once filled, the cotton inside will be hidden from view, making it a more convenient option than bulky floral foam for supporting your miniature flowers.
After landscaping my dollhouse, I like to wrap a green ribbon around the exposed edge of the base it sits on for a polished look. The ribbon can be made of lace or any material you prefer and is secured with hot glue. While green is a nice choice, feel free to use any color you like. Alternatively, you can fold your grass sheet over the base edges to conceal them.
Don't limit yourself to just grass and a few shrubs in your yard. You can enhance your scene with ponds, lakes, fences, outdoor buildings, and even a deck. Many of these items are available from miniature dealers, but many can also be custom-made to fit your space and preferences. All you need to do is purchase materials from a hobby, craft, or miniature store and let your creativity flow!